One of the baller features of Leadpages is they make everything easy, including adding your Facebook Pixel.
But, how?
In this post your going to learn how to quickly add your Facebook pixel to Leadpages (it should only take a few minutes), so you can get back to building your business, generating leads and getting sales…
Sounds good?… Let’s dive in…
Step 1. Grabbing your Facebook Code
Note! – If you haven’t create your haven’t created your Facebook Pixel, then you can create one pretty easily and quickly. All you have to do whilst inside of your events manager, is click the ‘Create a Pixel’ button.
If you get stuck, you can follow the instructions on this post to help you create your pixel.
The first thing you’re going to need to do is head on over to your Facebook Ads Manager. You can get there by going here: https://www.facebook.com/adsmanager
Next, you’re going to want to head on over to your events manager. Like shown below:
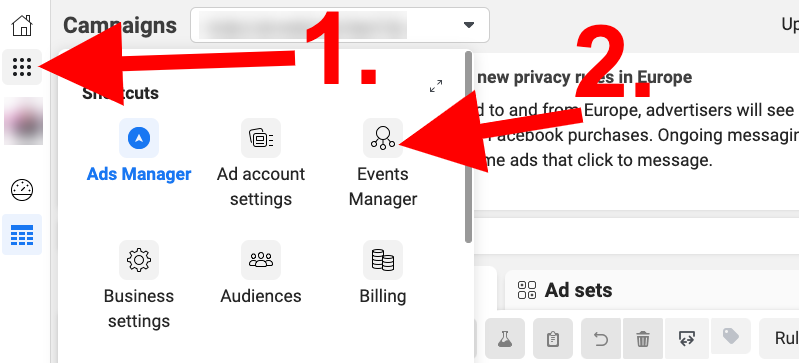
After following these two steps, you’ll be taken to the Facebook Data Sources page.
First find the pixel you are looking for, and click on it…
If you have never used the pixel before, then you’ll be presented with this page:
![]()
![]()
From here, click on “Continue Pixel Setup”.
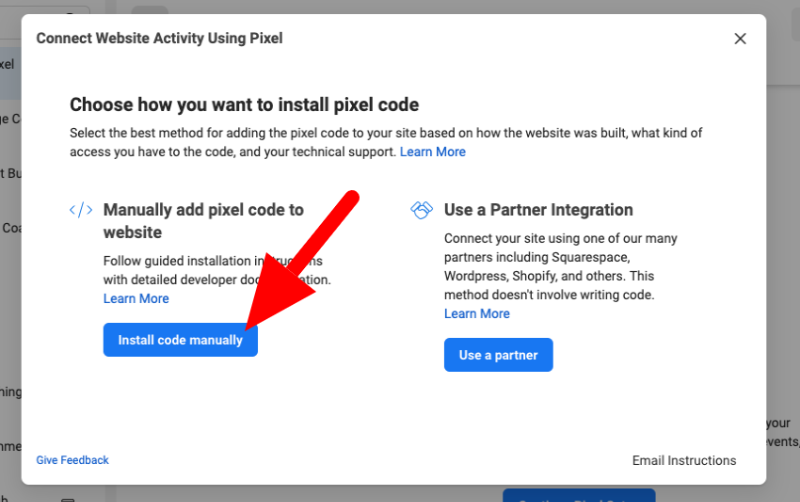
You’ll now be given two choices…
- Manually add your pixel code to your website…
- Use a Partner Integration…
Unfortunately, Leadpages is NOT one of Facebook’s partner integrations, therefore you need to click on “Install Code Manually”. As shown below:
Next, you’ll be presented with your Facebook Pixel code…
All you have to do is simply click the COPY CODE button to copy your Facebook Pixel Code to your clipboard. As shown below:
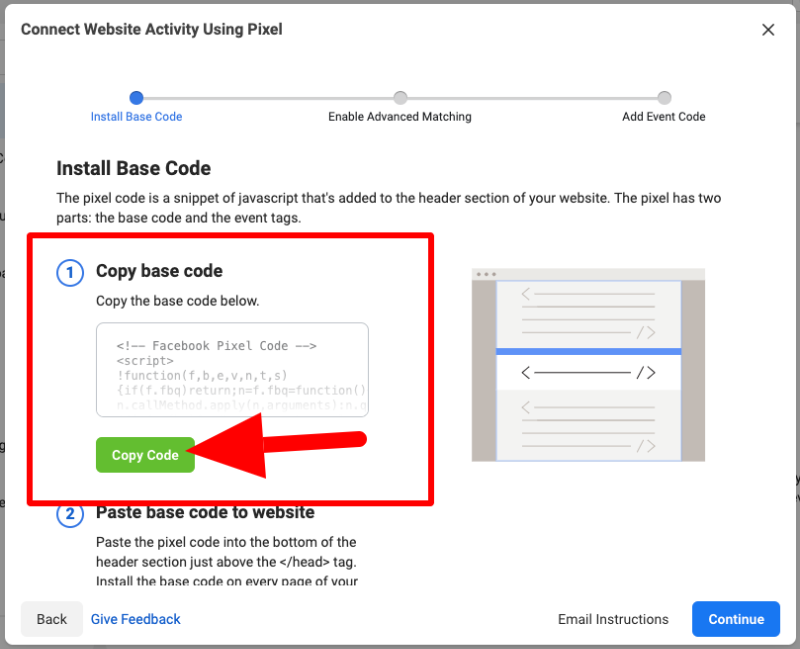
Note! – If you have someone on your team that is setting up your Facebook Pixel Code and designing your funnels & landing pages, you can email the code straight to them quickly and easily by click EMAIL INSTRUCTIONS. They’ll ask you for a recipient and then they’ll send your code straight to them.
Installing Your Pixel Code Into Leadpages
Okay…
Yes, the thought of trying to install code is normally a scary one, but in this instance it’s so simple. You don’t even need to get a coder to help you, and you’ll be done in less than 2 minutes…
So… In order to install your pixel code into Leadpages, you need to first head over to Leadpages and log into your account.
Once you’ve logged in, head over to the landing page or sales page that you’re looking to edit and open it up.
Once your landing or sales page has loaded, go to the side menu on the left side of the page and click on SETTINGS…
At this moment, you’ll be presented with 3 options:
- SEO
- Social
- Analytics
To instal the Facebook Pixel code, you need to click on ANALYTICS.
Now…
This is the point where a lot of people make mistakes when pasting their Facebook Pixel Code…
In analytics, you’re given a few options that might be confusing…
- Head Section Tracking Code
- Immediately After The Opening <body> tag
- Immediately Before The Closing </body> tag
HEAD SECTION TRACKING CODE is the one you need in order for your pixel to fire correctly.
So grab the Pixel code that you copied from Facebook earlier and paste it into the HEAD SECTION TRACKING CODE area, and click SAVE. As shown below:
![]()
![]()
Once you’ve done this and click SAVE… Make sure to click publish on every page. Only when you do this will your edits become live online.
These steps will need to be repeated for every page that you want to be able to track. So if you have a multi-step funnel in place, it is important that your pixel code is on all of the pages in the funnel including any thank you pages you have created.
This means you can track every step of your sales funnel like— page views, leads, view content, add to cart, submit details, enter checkout details, and purchase, which is incredibly valuable information that can help you improve your funnels and lower your advertising costs…
And that’s it! As you can see, it’s pretty simple and straightforward, and you definitely don’t need to get a coder to help you do it, which is nice and saves you money!
If you’re unsure if you have done everything correctly, you can install the free Google Chrome extension called Pixel Helper. When you’ve installed the Facebook Pixel Helper, you can check every one of your pages to see if they show the pixel in the chrome extension. This will help you keep track of whether or not it’s working so you don’t go too far down the line and then realise you’ve made a mistake.
Conclusion
The Facebook Pixel is an incredibly useful and powerful tracking tool that can give you key performance information regarding your Facebook ads and how well they’re converting and of course how well your landing pages and sales pages are converting too.
It allows you to notice when pages and ads aren’t converting as well as you’d like so you can tweak little things to try and boost conversions.
As you’ve seen in this post, adding the Facebook Pixel code to your sales pages, and opt-in pages in Leadpages only takes a few steps, and it’s really not as difficult as you may have first believed.
Now, you can get your Facebook Pixel Code on to your landing pages and get back to marketing, generating opt-ins and making sales!
Ultimately, I hope this tutorial has helped you install your Facebook Pixel Tracking Code without the stress it normally causes, and maybe saved you from having to hire a coder.
From here, enjoy all your new tracking possibilities!