
There are a lot of main street businesses that are closing down. The stores that used to line main street while you were a child are boarding up their windows and closing up shop. In fact, in many small towns, these ‘downtown’ areas sometimes look like ghost towns! And yet… there are online and ecommerce businesses flourishing. What’s the difference? I’ve been in this business for over a decade now, and I can tell you with 100% certainty that the new way to do business THAT WORKS is through sales funnels! Sales funnels can do everything that a small main-street business struggles with. They are making sales 24/7… not just from 9 to 5, monday through friday.
What Is a Sales Funnel?
Sales funnels come in many forms. In this article, we are discussing digital sales funnels. A sales funnel is really just a sales process. It is the journey that a prospect moves through, from initial contact with a brand, to the eventual purchase of a product. In the context of online marketing, a sales funnel is a digital mechanism for lead generation and sales. Sales funnels don’t take lunch breaks. Sales funnels don’t forget to check the counter. They don’t forget to pick up the phone. They don’t shut down on the weekends. They are always available, always ready to provide a solution, and always ready when the customer is ready to make a sale. And the best thing about a sales funnel is that it literally works for you while you sleep, as long as you have all of the correct systems in place.
Sales Funnel Components
- A landing/opt-in page
- A one-time-offer page
- A one-click upsell page
- A checkout and delivery page
- An email autoresponder sequence that builds value on the back-end
A good sales funnel will attract a target audience, and lead them through a series of steps… from an advert, to a landing page, to a website or landing page with an offer. The first offer shown on most funnels is a lead magnet, which is basically a free item offered in exchange for an email address. Not all funnels start out like this, but it is one of the most common ways to start a funnel… because it offers relevant value and a solution to your customers without charging them anything. In fact, for the most part, if you can get your sales funnel to get you opt-ins and break even on what you spend to acquire the traffic, the opt-ins alone and the email list members they bring you are a win. You don’t even need to make a profit on the front end of a funnel for it to be a success. As long as it is building your email list… that is the real key to building a 6-figure business online, because this process allows you to market directly to your customers on the back end of your funnel. The rate at which the sales funnel converts visitors into customers is known as the conversion rate. Different sales funnel stages have different functions, which may be anything from making sales to building an email list.
Sales Funnel Examples
- You run a Facebook ad as an invitation into your sales funnel. The ad sends traffic to your landing page, which is the entrance into your sales funnel and a means to capture user information.
- Once the user opts-in, and gives you their email address in exchange for their free lead-magnet, they are then directed to a ‘one time offer’ page, where they are given the option to buy a product at a significantly discounted price.
All pathways through your website end at a purchase decision, which is the reason that your sales funnel exists.
- You then create an email autoresponder sequence, using the email address you gathered in exchange for the ‘free widget’ you offered them as a lead magnet
- This is another crucial step in the sales funnel process, and will perform a number of functions
- Through these emails, you will introduce yourself to this new user, describe your business to them, thank them for opting in, and begin the process of broadcasting to them regularly… delivering a ton of free value
- Then, after some time, and after you have built up some trust, you market to them through your email
- This is how you make serious money on the back end of your sales funnels!
You can use one-time-offers and one-click-upsells to break even on your ad spend, of course… but the whole key here, for most successful funnels, is to get an email address. In fact, this approach… the self-liquidating sales funnel… is how Scott and Brian Moran, the co-founders of SamCart, get $10,723 in FREE traffic every day from Facebook ads. Whether you own your own widget company or sell widgets for someone else, the following article will lead you through five simple steps to building a website for your sales funnel. A funnel is not expensive to set up, but it will take some time and attention to get your first one running properly. Once you have your first sales funnel running, the world will be your oyster. Your new website/landing page will represent your widget company online, and form the foundation of your sales funnel. The landing page will present an offer in the form of a pitch, and then ask users for an email address in exchange for a ‘free widget.’ Over time, this page will grow your email list.
Build a Sales Funnel Website in 5 Steps
Let’s take a small break from talking about landing pages and email marketing to focus on one very important element of this game. Your WordPress website. Now, just to clarify, you don’t need a WordPress site to make money with a funnel. You can actually do everything you need to do, especially at first, with a landing page designed on Clickfunnels. But there are also a ton of advantages to setting up your own WordPress website. Most notably, you can blog on your site… which is the most powerful way to drive free, organic traffic to your landing page. You can also use WordPress themes like Thrive Themes, or as you will see here, a page builder like Elementor to build your funnels right on WordPress. So a WordPress site is super helpful, but you’ll need hosting for it. There are many hosting options out there, all with their pros and cons. But many are owned by the same three companies, and just aren’t any good. Here are a few important points to keep in mind when choosing a worthy host for your sales funnel setup.
Step 1. Hosting Considerations
- Pricing
- Load speeds
- Downtime
- Technical support
- Ease of set up
- Security
A2 is a hosting service that has been around for almost 20 years. They offer a few hosting packages with ridiculously fast server speeds. They are a perfect fit for WordPress, and provide a suitable environment for your website to flourish. A2 ticks all the boxes, with excellent customer support, great prices, and a developer-friendly setup. Your pre-configured SSL security certificate is even included. In case I didn’t mention the server speeds, they are some of the fastest we have ever seen. In your case, the best part of all this is the auto-setup feature. WordPress is pre-installed for you, which means that you will be up and running in no time. If you already have WordPress installed and have existing hosting service, move to step three, if not click here to get: Premium-hosting-made-easy
Step 2. WordPress
So you sorted out the hosting, and you are set-up in WordPress. Once you have taken some time to familiarise yourself, you will set up your first sales page, which will become the foundation of your sales funnel. (Don’t forget to start blogging, either! You should start blogging twice per week to build your website’s authority on your target niche! Learn how to use content marketing to drive organic traffic to your funnel to maximize traffic and opt-ins! To get started, you are going to install a new theme. A theme is a set of templates which affect the appearance and format of your website. The theme you are going to go with is OceanWP.
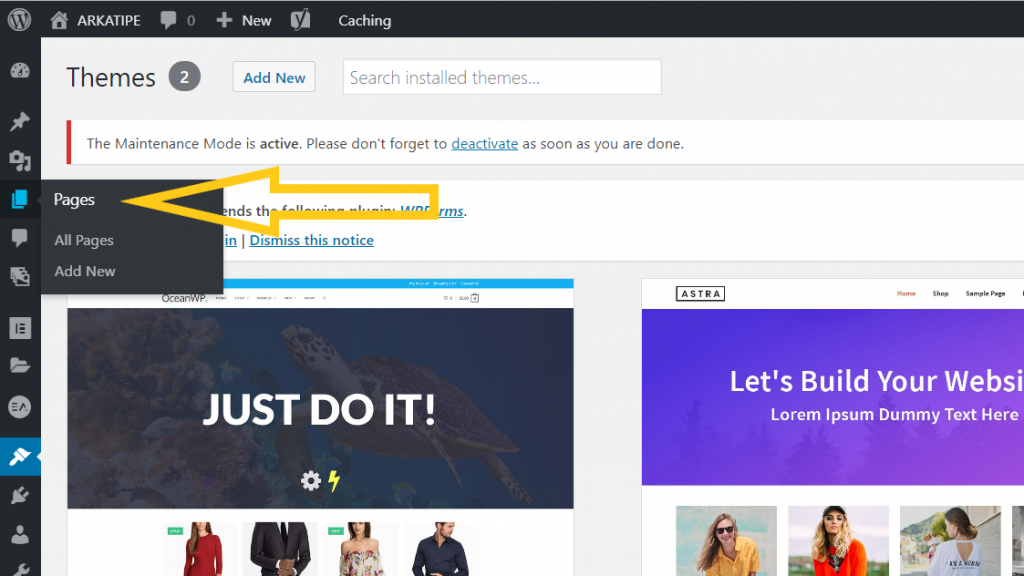
- On the left-hand side of the WordPress dashboard, hover over the paintbrush to reveal the menu. Select the themes option.
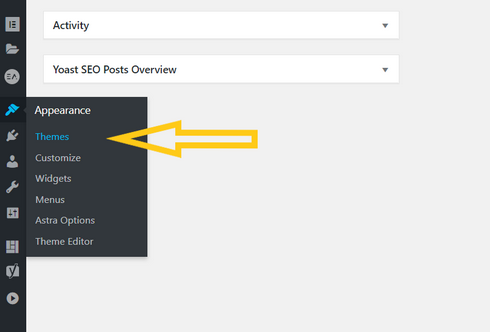
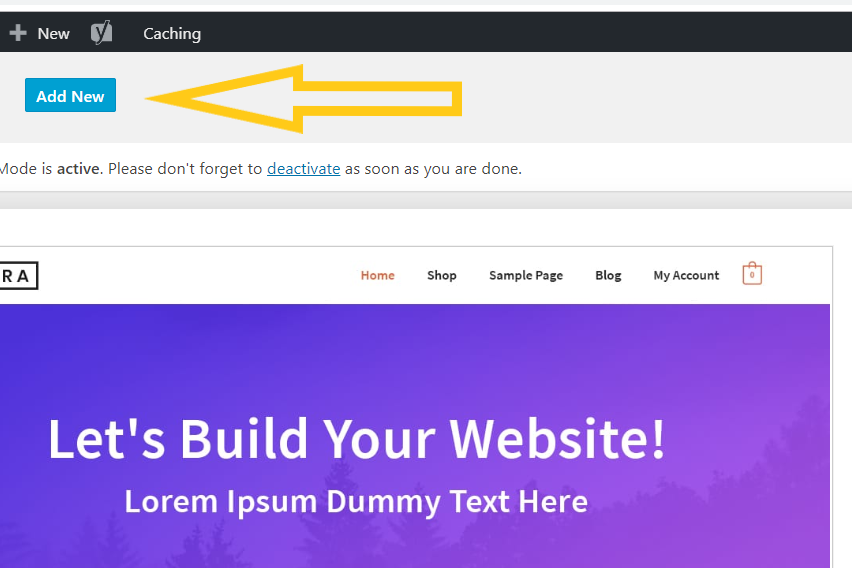
- On the Themes page, you will find the currently active theme. On the top left-hand side of the page, click add new.
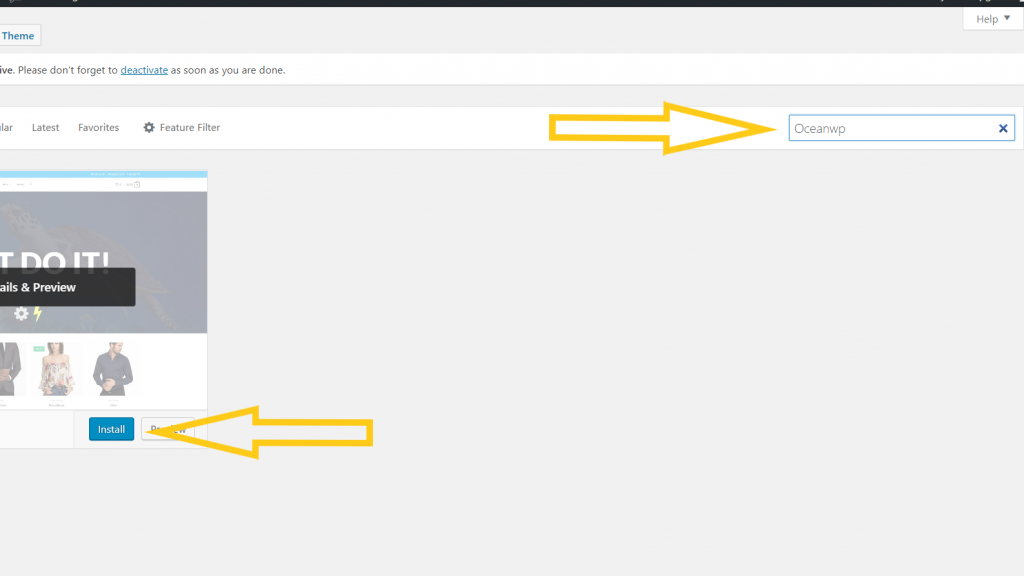
- In the top-right search box insert “OceanWP”.
- Click install
- The button will change, click activate.
Step 3. Elementor
Now you are going to install Elementor. Elementor is a visual page builder with drag and drop elements and features. It can also be used as a funnel builder plugin. There is a freemium version of Elementor, which is a nice way to feel your way around initially. Unfortunately, it is quite limited… and you will soon need to upgrade to Pro to create anything useful. The Pro Version is well priced and well worth it. The product is user-friendly, and Youtube has a wealth of information on all the functions. Elementor – Youtube The following will show you how to install the free plugin.
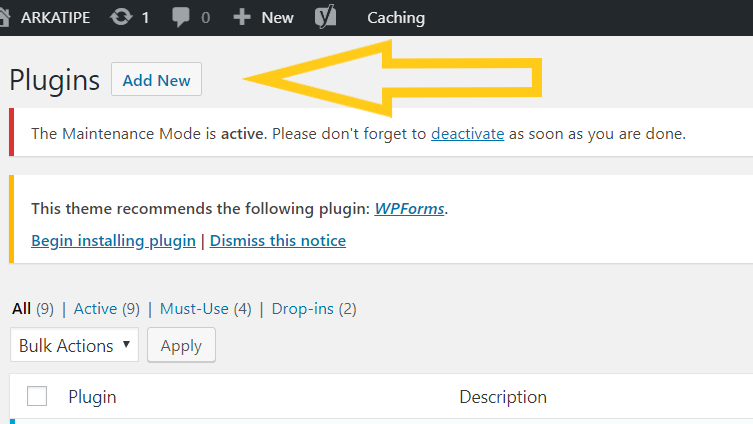
- In the WordPress dashboard, on the left-hand panel, hover over the plug icon and select plugins.
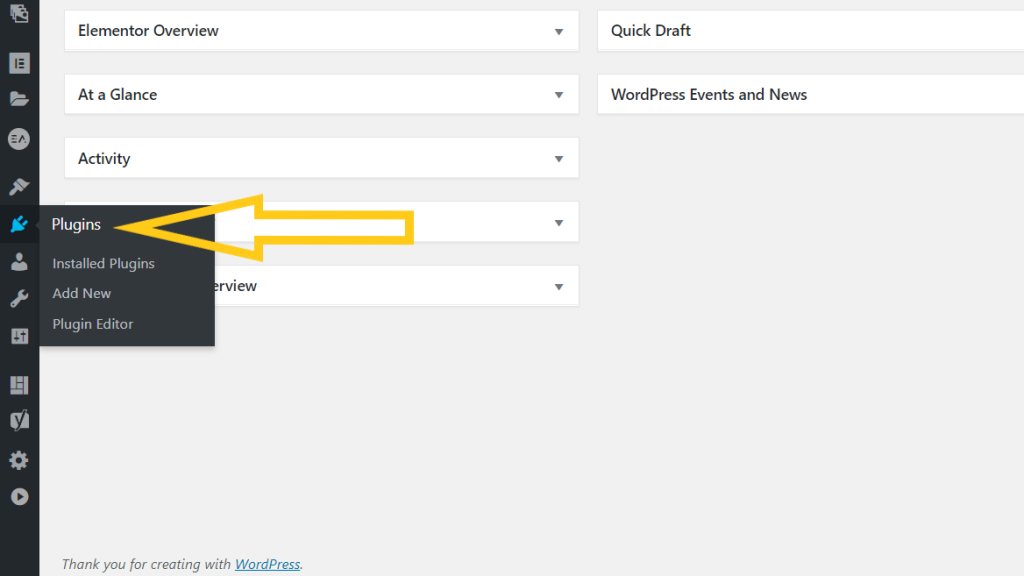
- On the top left, select add new.
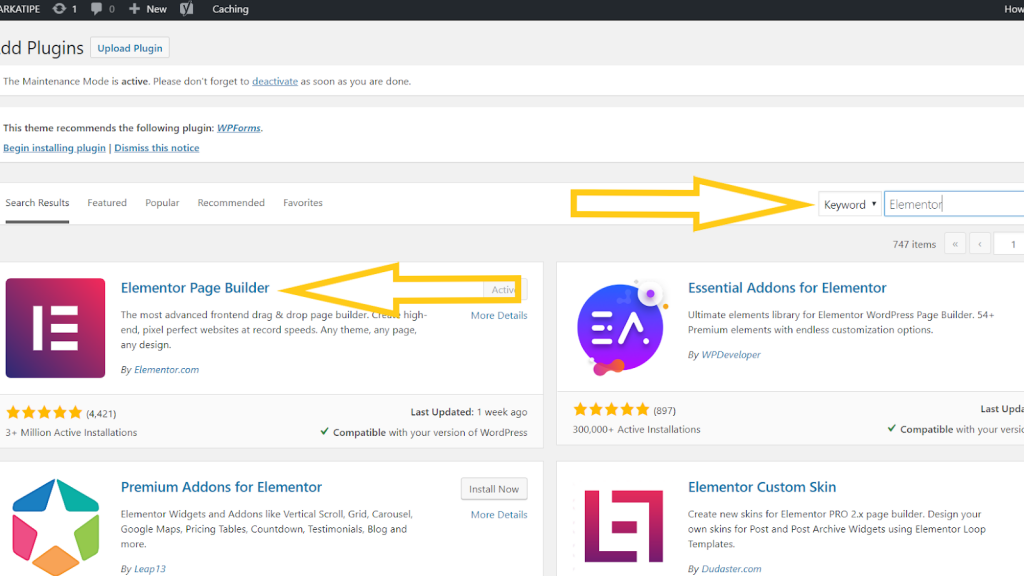
- In the search box type in Elementor.
- When it comes up, select install, and then activate.
 Once the Plugin is installed and activated, you can upgrade to the pro version here: Elementor Page Builder – Video tutorials and documentation will lead you through the simple setup. Now you are ready to start editing your first page.
- On the left-hand panel, select the pages icon.
- Select add new.
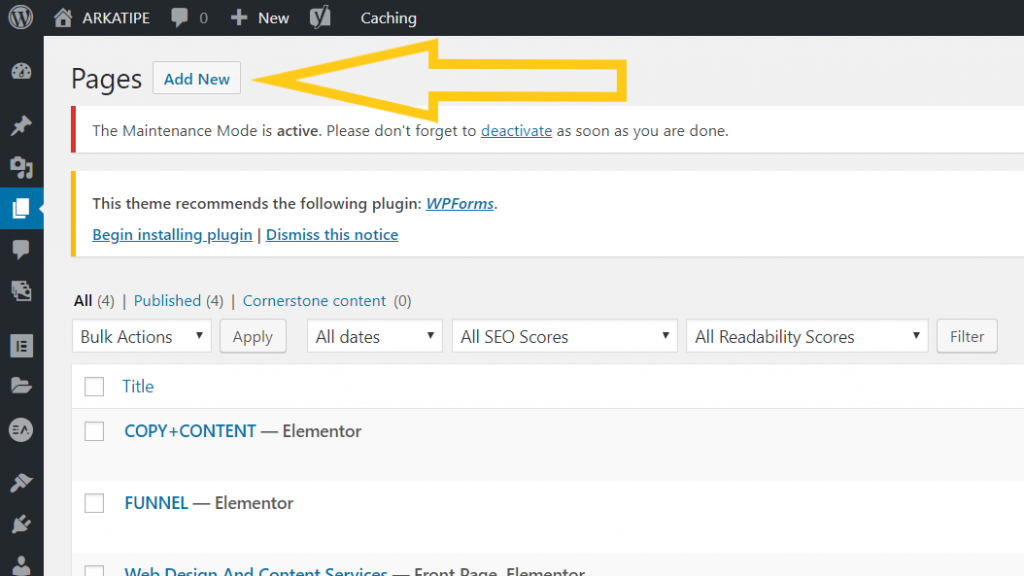
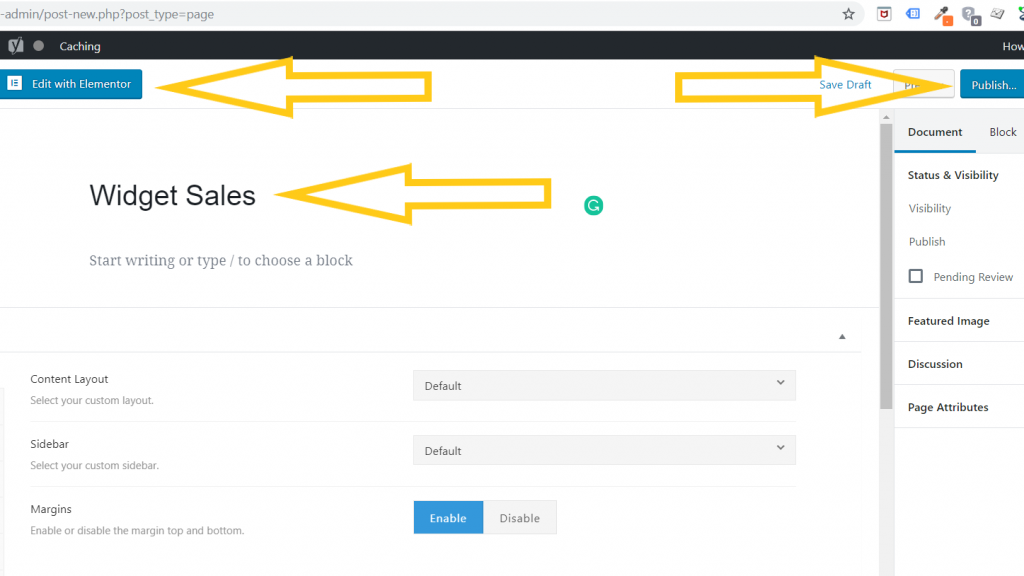
- Enter your title.
Add a page title that summarises what your page is about. Your page title is important for indexing your page in the search engines. Make sure that it is a good overview of what your page content is about.
- Click publish.
- Select Edit with Elementor.
 Once you have carried out the above instructions, you will be in the page builder interface. On the right is the workspace, and on the left is the control panel. The workspace is made of editable sections and columns. To build a website, you populate the sections with buttons, text, forms, images, and a host of other items. In this tutorial, you are going to build a simple, static sales page. The content will address the customer, lead them through a sales pitch, introduce the product, and motivate engagement.
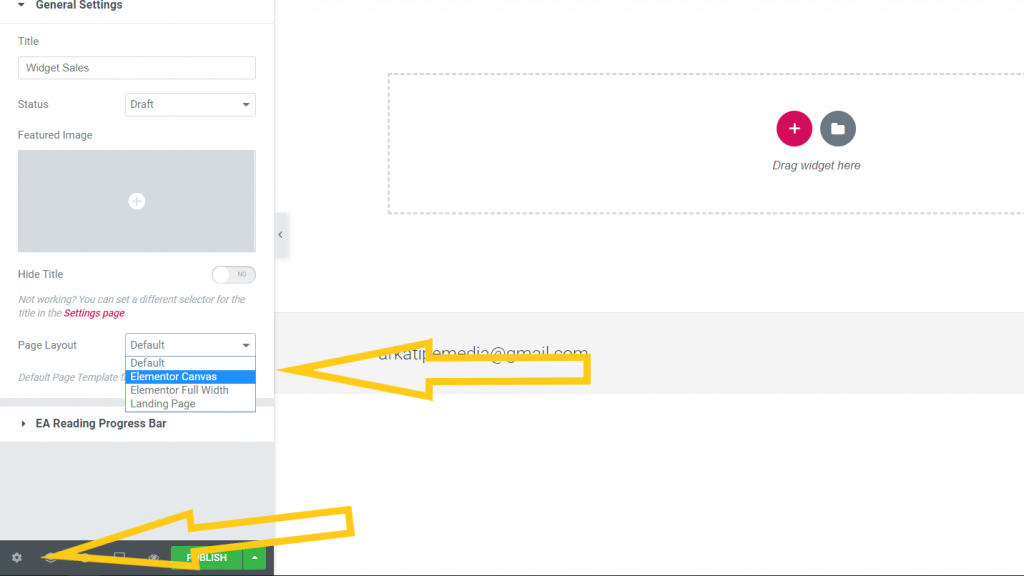
- On the bottom left of the screen, select settings.
- Above the settings menu is a page layout dropdown menu where you will select Elementor canvas.
- In the working area, click the plus sign.
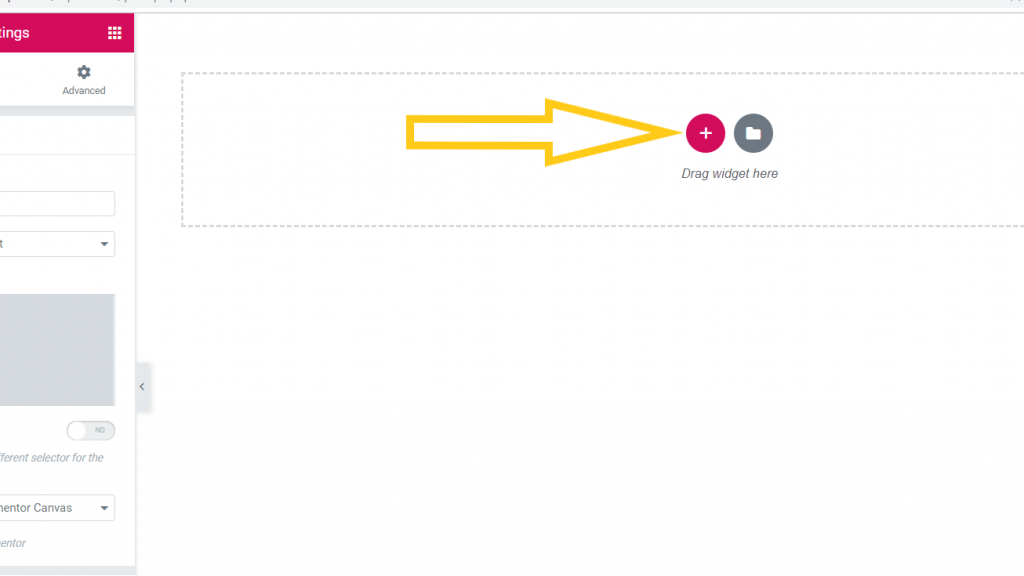
- Select the first option for the section structure.
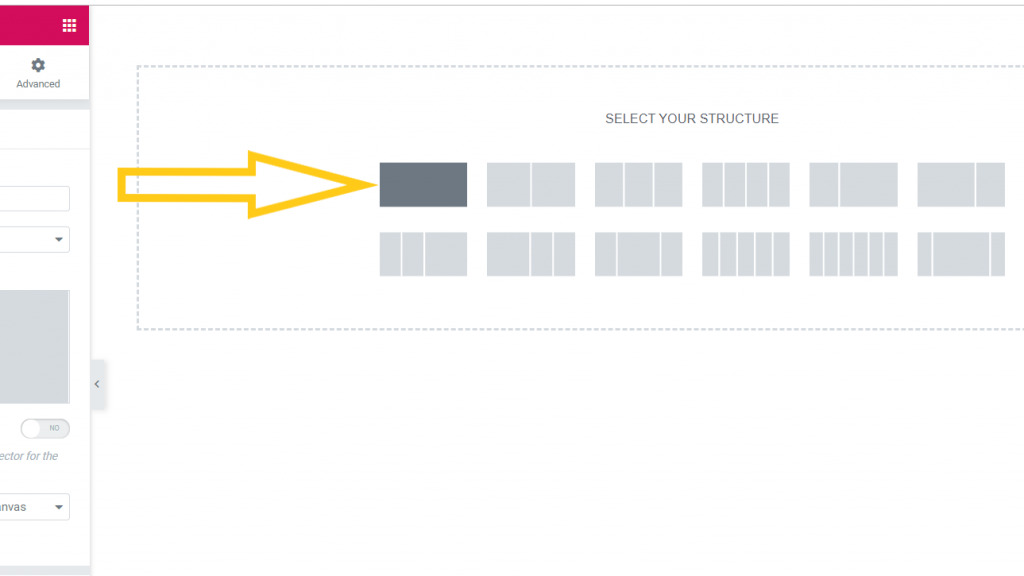
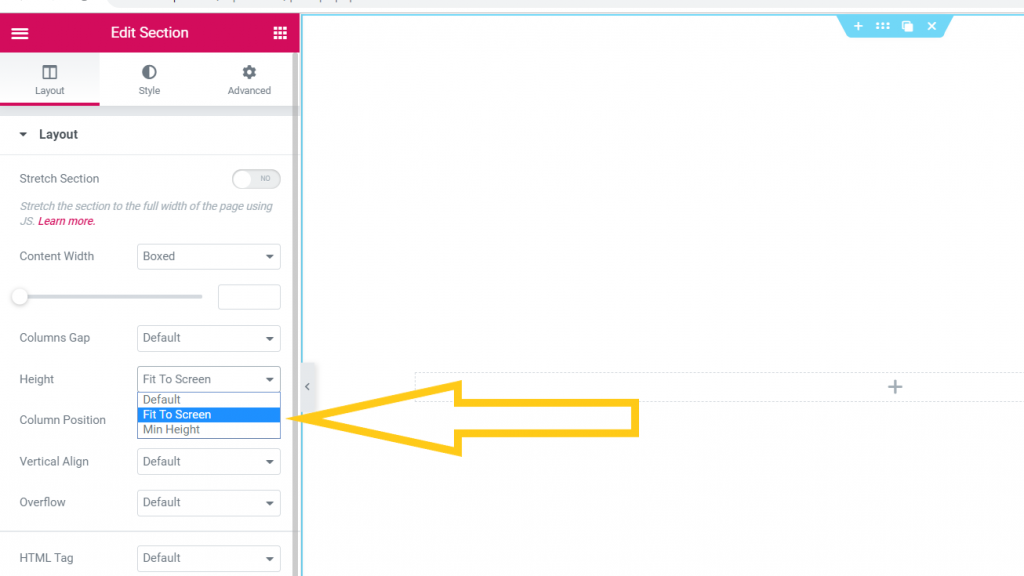
- In the control panel, under layout, select the dropdown menu for section height. Choose fit to screen.
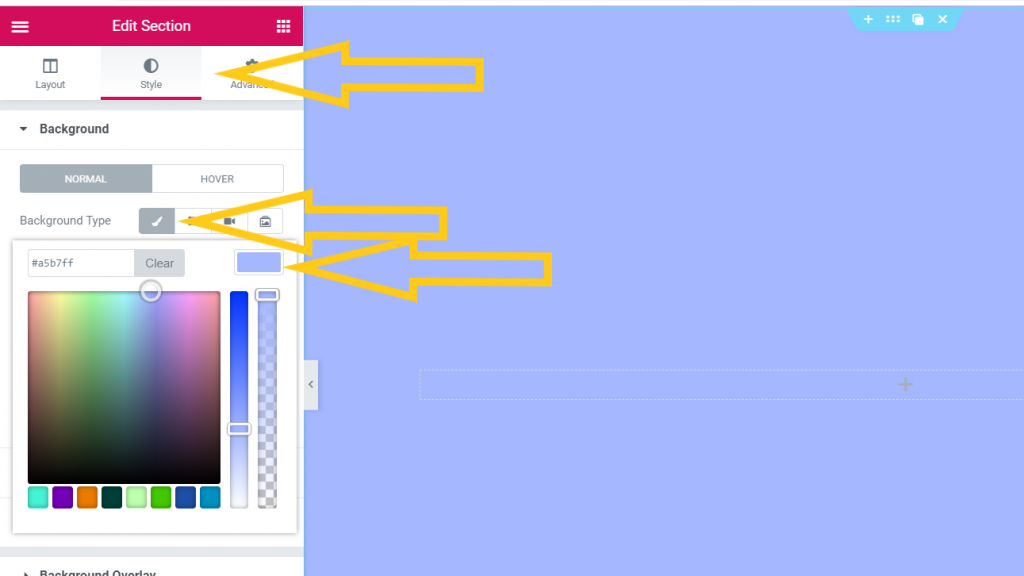
- To edit the section, select style, choose the paintbrush and then select the color you prefer.
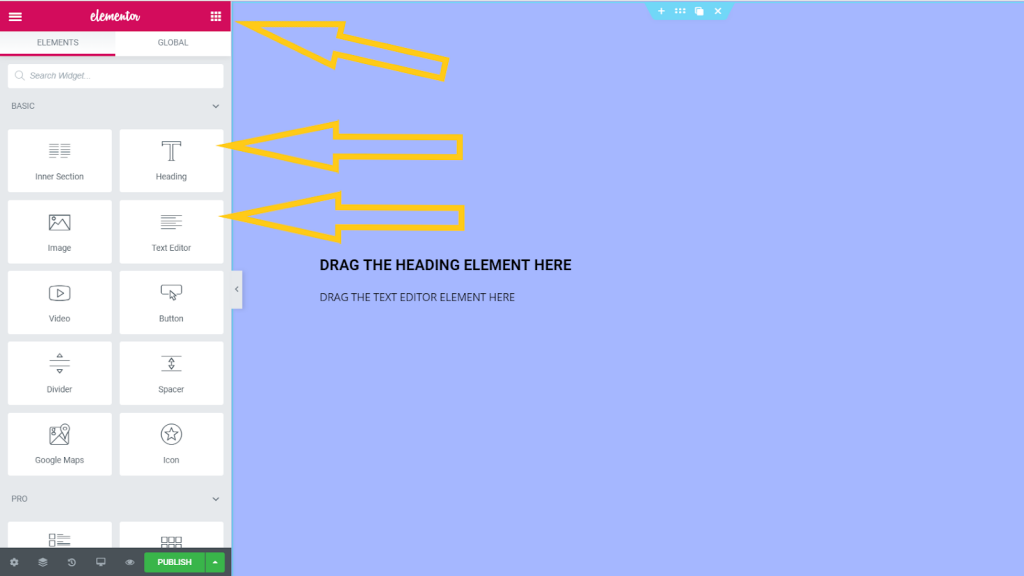
- At the top right of the control panel, select the elements menu.
The icons in the menu are element widgets which offer different functionalities for your page. Drag and drop them onto the working area as required. Spend some time on Youtube to help you, play around with the elements to get a feel for how they work.
- In the elements menu, click on the heading element and drag it out onto the workspace. Do the same with the text editor element.
 These page elements hold text content. To insert text, click on one of the columns and the editing block will open up inside the control panel. You can copy-paste your text content into the editing block now if you already have it. Otherwise, I will be discussing how to go about structuring your sales content in a moment, in case you need some guidance. The first website I ever made was for web design services. I used as many of the elements as I could to showcase what I could include on the customers’ websites. This is a perfect way to get a feel for the program, and I would recommend giving it a try.
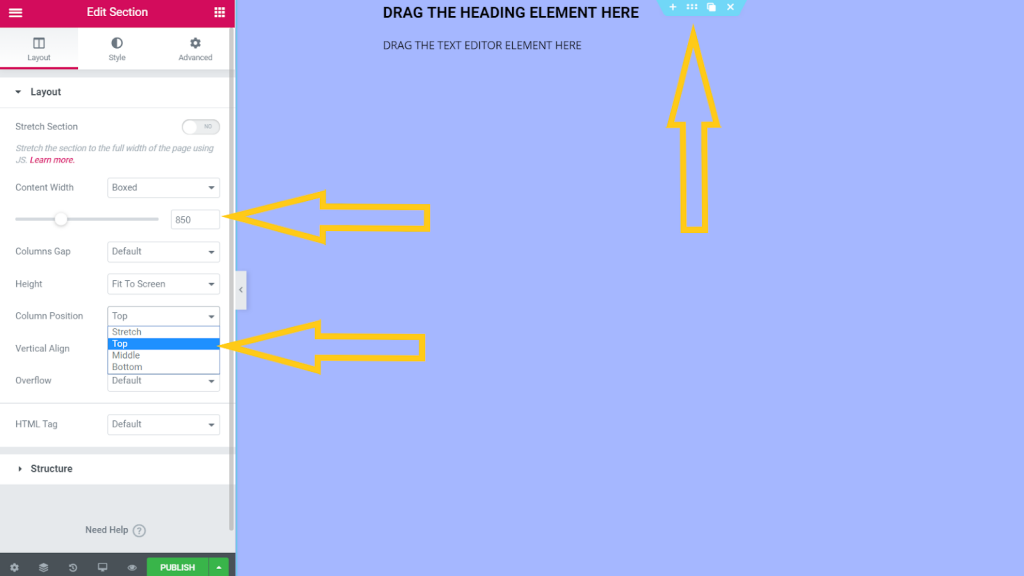
- The next step in the page build is to select the little blue tab at the top of the main section. Use the control panel to play with the formatting and positioning.
- There is a slider to edit the width of the content box for the section. Somewhere between 800 and 900 is quite comfortable for reading.
- With the dropdown menu for column position, get the text to the top of the page.
- To create spaces between the sections, go to the elements menu, select spacer, and drop it where you want it.
In this image, I use the spacer to separate the heading and text from the top of the page. Once the spacer is placed, a slider will appear in the control panel. Adjust accordingly. 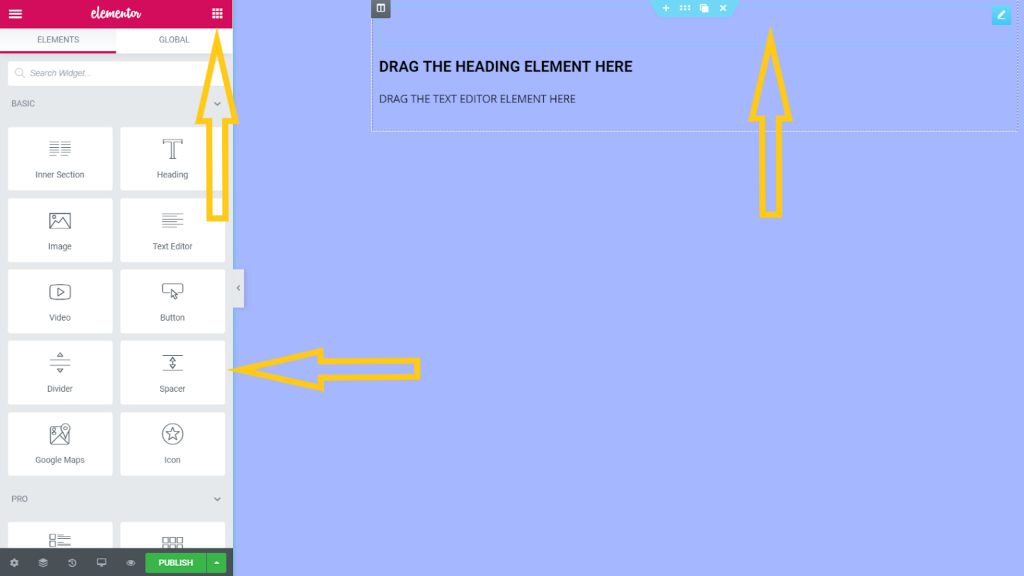
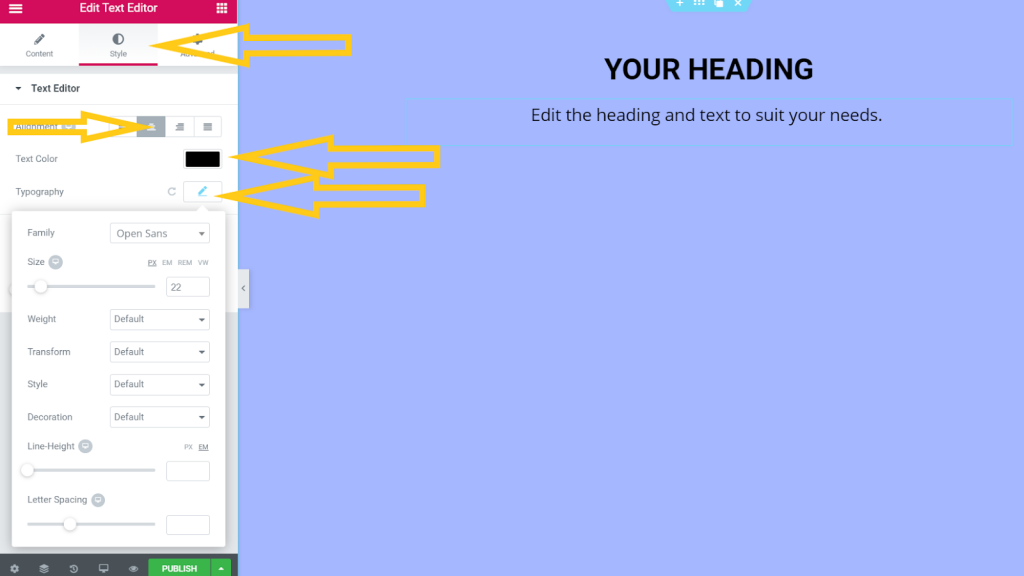
- In the style section, you can adjust text alignment, sizes, fonts, and colors, as well as many other parameters.
 Once you get to this point, you should have a fair idea of what is going on in the page builder. With each aspect you come to understand, you unlock a new level of design capability. Elementor makes the learning process a million times easier.
Step 5. Sales Content and the Call to Action
Your web page is only the first part of your sales funnel. A funnel starts with the landing page, which will showcase a simple call-to-action, usually featuring a headline with a couple of bullet points, designed to get the reader to share their email address for the ‘free thing’ being offered as the lead magnet. But your landing page can also contain other sales copy… video sales letters, headlines, customer reviews, etc. Once you get into the funnel, dynamic copywriting is really important! In fact, a good headline and sales page could make or break the conversion rate of your funnel… all the way from the opt-in page, to the one-time-offer, to the one-click-upsell, to the checkout page! If you’re looking for an awesome copywriting course, consider checking out The Simple Writing System, a free copywriting course by John Carlton. The content that you write for your web page must tell a complete story, from open to close. This script will be adapted and expanded through the rest of the sales funnel as you extend and optimize the funnel stages. Using a story to emotionally sell to your audience is a very effective tactic! Check out Andre Chaperon’s Story Powered Marketing course to see how this can be utilized to great effect! The following pointers will help you develop the script to be used through your sales funnel. Remember, don’t try and sell a product to the prospect right away. Your sales funnel should move the prospect through a series of small conversions, leading up to the final goal of the sale. The first sale will be your One-Time-Offer, a discounted product that will offer even more value, and build upon what the customer already got with their lead magnet.
Selling Your Lead Magnet And Getting That Email Address
Define your product or service. Write out the features and benefits. Define the target audience. The perfect customer is known as the target persona, or customer avatar. Write a brief backstory about this person. Describe their demographics and the problems that your product can help them solve. Your entire sales funnel is made to explain to this person how you are going to solve their problem. If you have been running your widget company for a while now, you will likely know your audience already. If you are still new to your market, you should do quite a bit of research on your customer. This is the person that you are writing to, and so you need to understand them very well. Social media groups and forums can be a good gauge of what the niche-related sore points are. Quora and Reddit are good resources too. Once you understand your product and the value it can bring to your reader, then you can begin to write the pitch.
Crafting A Dynamic Sales Pitch
You start with an introduction, to let the reader know that the article will help them solve their problem. Address the audience in industry-relevant language. The first part of the sales pitch is to let the target know that you understand the problem faced, and that you are qualified to solve it. Once the problem has been set up, you can then lead into the product as the solution to the problem. You will explain how the product has easily solved problems like this many times before. If your opt-in offer requires them to buy something, consider objections that the reader might have. Pricing, competition, feature queries and hurdles in the buying process… these should all be addressed. Answer all questions before they arise. Pacify all possible issues that the target might face in the buying process. Include social proof in the form of company affiliations, references, recommendations and statistics. Anything that makes reference to your good history, good relationships, or a worthy product, is good for sales. Include any big-name clients or positive feedback on past work. Remember to put the reader first. Don’t write too much about your story or your product features. We all want things like time, money, health, beauty and love. Present your core benefits around these ideals, as they will be more effective than mentioning the number of buttons or options. Once you have introduced, set up, and presented your offer as the solution, it is time to close. On a sales page, a close is called a call to action.
The Call To Action
There are different types of calls to action, depending on the goals of the sales page. A few types:
- Direct call
- Text
- Fill in details on a form
- Make a purchase
- View contact details
- Follow a link to another page
If all goes according to plan, the customer will arrive at this point with all objections cleared up. They should be ready to opt-in to your offer and follow your instructions. For the hesitant ones, include motivation to encourage the required actions through dynamic, engaging sales copy. If you can sell this well, it will make the customer feel like they are getting such a good deal that they really can’t pass it up!
Designing An Opt-In Page In Elementor
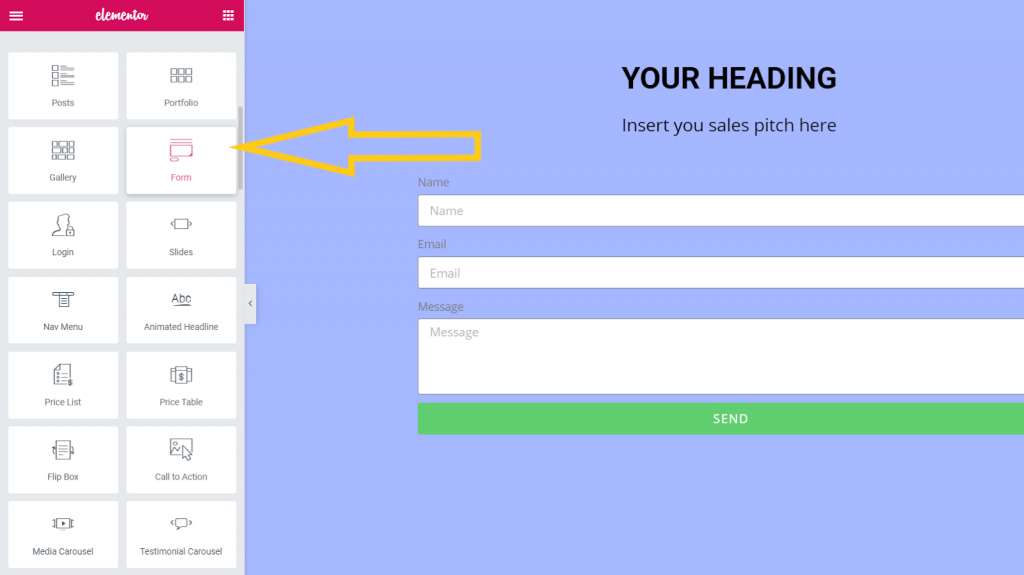
As for our opt-in page in Elementor, the call to action is going to be a form. The form element is an editable series of fields. The reader inserts their relevant details depending on the form type. In our case, you are going to include a simple form to gather names, email addresses, and query messages. The freemium version of Elementor does not have access to the form element. An alternative, is to include your contact details at the bottom, instead of the form. Otherwise, be smart and install Elementor Pro. Elementor Page Builder – Video tutorials and documentation to lead you through the simple setup.
- To set up the form element, go to the element menu and scroll down to the form option. Drag and drop it underneath the text block on the page.
 On the control panel, you can now edit the form fields. Select the field to be edited, and change the label and placeholder as required.
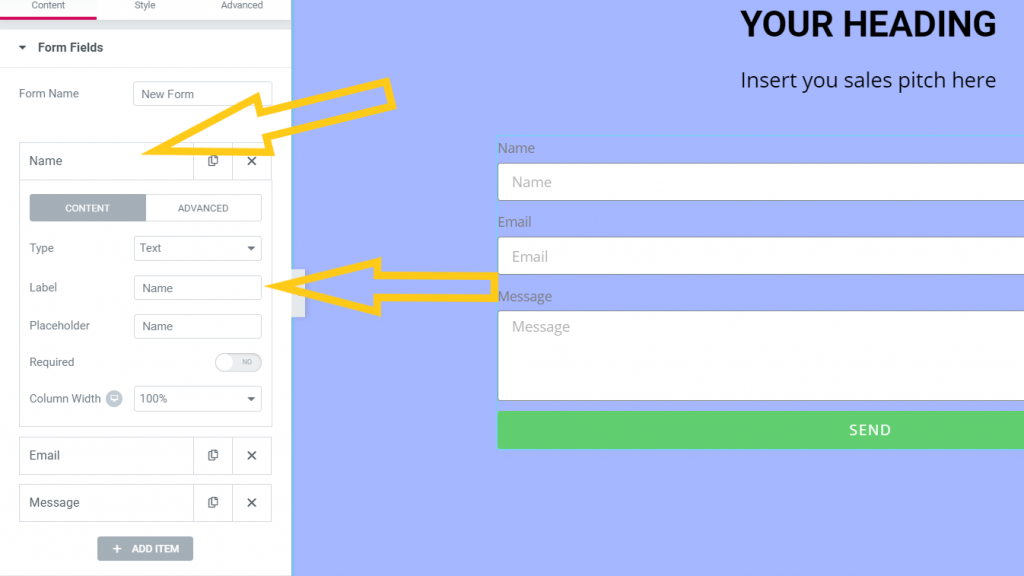
- If you scroll down in the control panel, beneath the form field editor, you will see the email tab. Open it and type in the email address where you would like the form entries to be sent to. You can also edit the subject line to be included with the emails if required.

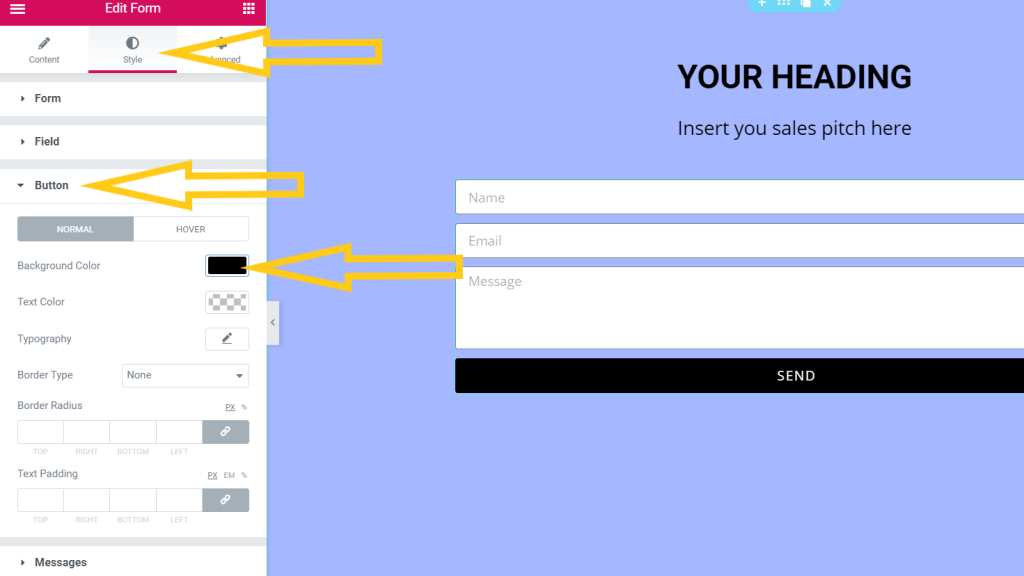
- To edit the button on the form, select style, scroll down to the button tab, then edit the color as required. If you would like the button to change color during hover, turn the selector in the control panel from normal to hover. Edit as required.
 This brings us to the end of the tutorial.
Conclusion
If you made it this far, you are well on your way to constructing the foundation of your first sales funnel. Of course, a website is of no use without any traffic. Your next job is to attract traffic into your funnel. This could be done with anything from blogging, to a small email campaign, to social media marketing, or even with a pay per click campaign. Once your first working sales funnel is set up and you have begun selling, you can then begin developing the next one, and the next, until you have a series of sales funnels selling a host of offers. Andre Chaperon talks a lot about this in his Tiny Asset Engines training. Here’s to a successful sales funnel, effective lead generation, and booming sales figures! *As you can see, a sales funnel can be built with a relatively simple toolset. A2 hosting for WordPress, plus the Elementor Pagebuilder, will get you off to a winning start. HIGH-SPEED PREMIUM HOSTING WITH A2 ELEMENTOR PAGE-BUILDER FOR WORDPRESS